asciinema is an excellent tool for technical blogs, documentation, and landing pages alike. It allows you to create compact animations of commands along with their output and formatting with far less overhead than the alternative of creating a gif or mp4.
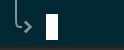
One minor downside is that if you use a custom font in your prompt to jazz it up a little (like Font Awesome or Nerd Fonts, as many programmers do) your asciinema cast might end up looking something like this:
Notice the □ (U+25A1 WHITE SQUARE) where the custom glyphs should be. The exact placeholder character rendered depends on what font you use, but this is a common choice.
Naively adding a whole font
You could very easily solve this problem by just adding an entire font file to the asciinema cast like this:
@font-face {
    font-family: "My Special Font";
    src: url("/css/fonts/special.ttf") format("truetype");
}

.asciinema-terminal {
    font-family: 'My Special Font', Consolas, Menlo, 'Bitstream Vera Sans Mono', monospace, 'Powerline Symbols';
}
Font files are big though, so doing it this way will add significant bloat to your static assets, making users download potentially thousands of glyphs that your casts don’t actually use. eg: Sauce Code Pro Nerd Font Complete is 944KB raw and around 528KB gzipped. That’s a lot of data for only a few characters, especially when the entire purpose of aciinema is to avoid requiring huge gif or mp4 files for terminal animations!
Only loading the fonts you need
Fortunately, the source for asciinema casts is plaintext and relatively readable. This is the entire source for the above simple cast:
{"version": 2, "width": 238, "height": 67, "timestamp": 1528769911, "env": {"SHELL": "/bin/zsh", "TERM": "xterm-256color"}}
[1.766208, "o", "\u001b[1m\u001b[7m%\u001b[27m\u001b[1m\u001b[0m \r \r"]
[1.768863, "o", "\u001b]2;roganartu@mbp: ~/Code/blog\u0007\u001b]1;~/Code/blog\u0007"]
[2.063703, "o", "\r\u001b[0m\u001b[27m\u001b[24m\u001b[J\r\n╭─\u001b[39m\u001b[0m\u001b[49m\u001b[44m \u001b[30m\u001b[39m \u001b[30m…/Code/blog \u001b[42m\u001b[34m \u001b[30m \u001b[39m \u001b[30m master \u001b[49m\u001b[32m\u001b[39m \r\n│\r\n╰\u001b[39m \u001b[K\u001b[194C\u001b[1A\u001b[1A\u001b[39m\u001b[0m\u001b[49m\u001b[30m\u001b[39m\u001b[40m\u001b[32m \u001b[32m\u001b[39m \u001b[39m\u001b[33m\u001b[39m\u001b[43m\u001b[30m 2.38G \u001b[30m\u001b[39m \u001b[39m\u001b[91m\u001b[39m\u001b[101m\u001b[38;5;195m 91% (6:00) \u001b[38;5;195m\u001b[39m \u001b[39m\u001b[37m\u001b[39m\u001b[47m\u001b[30m 22:18:33 \u001b[39m\u001b[00m\u001b[1B\u001b[1B\u001b[49m\u001b[234D"]
[2.063989, "o", "\u001b[?2004h\u001b[?2004h"]
[2.64222, "o", "e"]
[2.862095, "o", "\bex"]
[2.961866, "o", "i"]
[3.077862, "o", "t"]
[3.663037, "o", "\u001b[?2004l"]
[3.663275, "o", "\u001b[?2004l\r\r\n"]
[3.664595, "o", "\u001b]2;exit\u0007\u001b]1;exit\u0007"]
This may seem like gibberish, but remember that asciinema casts include ANSI escape codes (for things like moving the cursor around and setting colours, common in custom prompts) as well as the unicode code points for any non-ascii characters.
There are two types of lines: a header and I/O lines.
{
    "version": 2,
    "width": 238,
    "height": 67,
    "timestamp": 1528769911,
    "env": {
        "SHELL": "/bin/zsh",
        "TERM": "xterm-256color"
    }
}
The source of each of these elements can be found in the asciinema recorder source code.
I/O lines
[2.64222, "o", "e"]
The three elements here are defined in this line of code. The first is a float representing the number of seconds since the start of the cast that this output line should be printed, the second appears to be a constant "o", and the third is the actual text that should be output. To replay the cast, the asciinema player iterates through the lines in the file and outputs each chunk of text at the right time.
Subsetting the font
Now that we know the structure of the cast files we can go through it to figure out the unicode characters that are missing from our font. Let’s start with the bottom line of the prompt:
[2.063703, "o", "... ╰\u001b[39m \u001b[K ..."]
Where \u001b[39m is the ANSI code for Default foreground color, \u001b[K is the ANSI code for Clear to end of line, and I’ve omitted much of the prompt for simplicity.
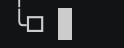
Expected
Actual
A script to find missing glyphs
#!/usr/bin/env python3

import glob
import json
import os
import string
import sys

import click
from fontTools import subset

def _get_cast_chars(f):
    for line in f:
        json_line = json.loads(line)
        if not isinstance(json_line, list):
            continue
        if len(json_line) != 3:
            print(f'Unexpected number of array elements: {json_line}\n')
            continue
        for char in line[2]:
            yield char

@click.command()
@click.option('--input-font', required=True,
              help='Path to input font file.')
@click.option('--output', required=True,
              help='File to output subsetted font to.')
@click.option('--casts', required=True,
              help='asciinema cast file or directory')
@click.option('--exclude-ascii', is_flag=True,
              help='Exclude ascii characters from subsetted font?')
def main(input_font, output, casts, exclude_ascii):
    # Build list of unicode codepoints that the asciinema casts require
    cast_chars = set()
    if os.path.isfile(casts):
        with open(casts, 'r') as f:
            cast_chars = set(_get_cast_chars(f))
    else:
        for cast_file in glob.iglob(os.path.join(casts, '**', '*.cast'),
                                    recursive=True):
            with open(cast_file, 'r') as f:
                cast_chars = cast_chars.union(set(_get_cast_chars(f)))

    # Exclude ascii chars (0-127)? If the font you are including is only
    # for glyphs then you don't really need them.
    if exclude_ascii:
        cast_chars -= {c for chars in [string.ascii_letters,
                                       string.digits,
                                       string.punctuation]
                       for c in chars}

    # Exclude whitespace, fonts don't register these characters so
    # leaving them in here will break fontTools.subset
    cast_chars -= {c for c in string.whitespace}

    return subset.main(args=[
        input_font,
        '--unicodes={}'.format(''.join(cast_chars).
                               encode("unicode-escape").
                               decode("ascii").
                               replace("\\u", "U+")),
        f'--output-file={output}',
        '--timing',
    ])

if __name__ == '__main__':
    sys.exit(main())
Usage
asciinema_font_subsetter.py --input-font special.ttf --output glyphs.ttf --casts casts/ --exclude-asci
Result
$ ls -l output.* | tr -s ' ' | cut -d ' ' -f 5,9 | sort -h --reverse
963972 special.ttf
539394 special.gz
1796 glyphs.ttf
1092 glyphs.gz
Much better, 1.75KB is a far more stomachable size to include in the assets for users to download, and it gzips to nearly under 1KB so we keep a pretty good compression ratio (1.66 vs 1.78). This represents nearly 500x reduction in size from the original naive approach of including the entire font.
Using the new glyph-only font
Add the following to your CSS file:
@font-face {
    font-family: "Terminal Glyphs";
    src: url("/css/fonts/glyphs.ttf") format("truetype");
}

.asciinema-terminal {
    font-family: 'Terminal Glyphs', Consolas, Menlo, 'Bitstream Vera Sans Mono', monospace, 'Powerline Symbols';
}
The glyph-only font subset you just created is first in the list to minimise the chance of loading some special glyphs from the existing fonts and having them not line up or match properly with ones that font doesn’t have.
Final result